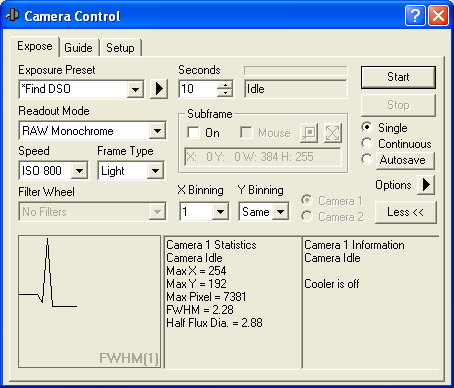
Open the Camera Control window and select the Expose tab.

Turn Subframe Off. This will ensure that you get the entire image.
Turn off Binning by setting the X Binning value to 1 and the Y Binning value (if enabled) to Same. This will give you the highest resolution image, and will also make color imaging possible.
Set the Readout Mode to RAW Monochrome. This provides the best quality final image, because you can perform dark subtraction before color conversion. Please note that RAW images will look odd when displayed. They will be monochrome, and they will change appearance when zoomed in and out because of the way Windows displays images on the screen. These images will not look "correct" until the Convert Color command is applied.
Set Speed to ISO 800. For many cameras, this is the gain setting that results in the best sensitivity and dynamic range. You may need to experiment to find the best setting for your particular camera model.
Options allows you to adjust advanced camera settings (when supported by the camera), set the camera control window to remain always on top, and to automatically flip or rotate images upon download.
Under the Options menu, select No Calibration. If you wish to perform calibration (dark subtraction, flat-fielding, etc.) immediately as each image is taken, you must first set up calibration frames using the Process menu Set Calibration command. Then select Full Calibration. Simple Auto-dark can also be used, but you will have to manually cap the telescope for dark frame exposures because the DSLR cameras do not provide a method to take images with the shutter closed (this is a firmware limitation of the camera itself). Some cameras provide a built-in "noise reduction" option that takes dark frames for every exposure; however, this doubles the amount of exposure time required.
Set Frame Type to Light (normal image frame).
Dial in the desired exposure time in the Seconds field.
Click Expose and an image will appear. If you like you can save the image to disk.