The Set Calibration command allows you to configure the calibration function. Calibration is used to overcome limitations in CCD cameras, as well as other instrumental effects (e.g. vignetting). Calibration greatly improves the signal-to-noise ratio and photometric accuracy of images. For more information on calibration and these tools, please see Image Calibration under Guide to Astronomical Imaging.
Calibration requires special "calibration images" taken with the same CCD camera as the image being calibrated (the "light"). These must be full-frame images, acquired at the same binning and temperature (if possible) as the "light". They come in three types: the Bias Frame is used to remove offsets, the Dark Frame to remove variations in dark current, and the Flat-Field Frame to remove pixel-specific differences in sensitivity, as well as variations in illumination across the camera sensor. All three types are usually constructed by combining multiple calibration images into a "master". This reduces the effect of readout and thermal noise compared to using single calibration images. For more information on calibration, please refer to the appropriate sections of the manual.
MaxIm DL allows you to create an arbitrary number of calibration groups, each containing one or more calibration images, all having the same dimensions. Each group is identified by its image type (bias, dark or flat) and the properties of the images that it contains, namely filter (for flat fields only), exposure duration, image and pixel size, binning, camera temperature and ISO speed, though not all of these are always present. During calibration, MaxIm DL will select the calibration group of each type - bias, dark and flat - that best matches the currently active image, if any. If there is no flat-field with a matching filter name, an otherwise-qualifying flat field with no filter name will be used instead if it exists. If the image to be calibrated is a subframe, calibration is performed using the appropriate subregion of the calibration images.
MaxIm DL's calibration groups form a kind of "menu" of available calibration frames for your main cameras and guiders alike, under a variety of conditions. You generally do not need to switch manually between different groups of calibration images, because the correct groups are selected automatically each time you calibrate an image, based on information in the raw image FITS header.
The first time a particular calibration group is used, MaxIm DL combines its constituent images to produce the master frame required. Masters remain in memory until the Set Calibration command is run again or MaxIm DL is shut down. If you expect to use the same calibration groups in later processing sessions, you can create their masters explicitly, causing them to be saved to disk as new files; these are simply reloaded without needing any combine processing. Each group has properties specifying how its images are to be combined. Groups of dark frames have additional settings that control whether and how they are scaled to match the exposure duration of the image to be calibrated. Dark groups can also specify an associated bad pixel map to be applied to the light after calibration.
Groups of color images are handled slightly differently from monochrome images. For color images, the filter name is always TRICOLOR and cannot be altered. When selecting the calibration group to use when calibrating a given image, MaxIm DL will only select groups which match the color state of the image that you're calibrating, meaning that only color groups will be considered for a color image, and only monochrome groups will be considered when calibrating a monochrome image.
Note that RAW images from DSLR cameras will be treated as either color images or monochrome images, depending on the Convert to Color option in the File menu Open command.

Beginners may wish to use the Calibration Wizard to help select the correct settings. The best way to use this command, though, is to use the Automatic features.
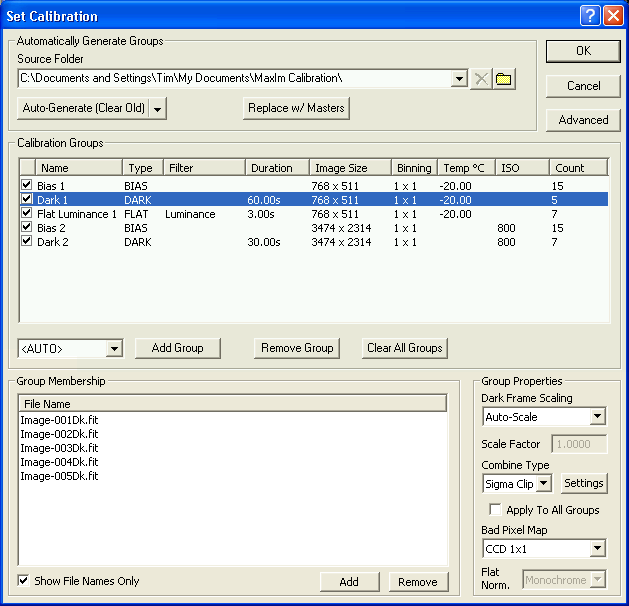
When a particular group is selected in the Calibration Groups control, its constituent files are listed in the Group Membership area. These are the files that will be combined to produce a "master", which is then used to calibrate a light image. The other settings for the group are shown under Group Properties, to its right.
Automatic Group Setup
This is the recommended method for setting up calibration.
Although you can create groups and add files to them manually, the Set Calibration command can automatically sort a set of calibration images into appropriate groups. Type the path of the folder containing the images into the Source Folder control, or click the adjacent "folder" toolbar button to choose one using a folder browser. (The most recently scanned folders are kept in the dropdown history; to remove an entry, select it and click the "X" toolbar button.) Now click Auto-Generate, which has two modes selectable via its drop menu: Clear Old and Keep Old control whether existing calibration groups are deleted or retained. The Source Folder will be scanned, and any images present will be divided into groups whose contents have similar properties. If Include Subfolders in the drop menu is checked, image files in the subfolders of the Source Folder are classified and distributed to the calibration groups as well. The file scan can be interrupted by clicking Cancel in the progress dialog, which may or may not result in the creation or modification of calibration groups.
The speed of image calibration can be greatly improved by the use of master frames. A master frame is the combination of all images in a group, that has been pre-calibrated using the appropriate bias (and, in the case of a group of flats, dark) groups. Once generated, calibration will no longer need to load and combine the images in a group whenever that group is needed.
The Replace w/ Masters button can be used to automatically generate calibration groups that use master frames. When clicked, the Set Calibration dialog will automatically generate the master frame for each group, and save it to disk. The files are saved in the folder specified by the Source Folder control, and each file's name is generated based on the description of the file. Once all of the master frames are successfully saved, the file list for each group is changed. The existing files are removed from the group, and the single master frame that was constructed from them is added. No other group properties will be changed.
Note: Settings are saved between sessions. If you calibrate an image without first running the Set Calibrate command, the previous calibration files will be loaded.
Scaling and Combine Type
Dark frames can be automatically scaled to match the duration of the light frame. Note that in order to work correctly, you must use a Bias frame.
Dark Frame Scaling allows you to select one of several dark frame scaling modes:
Auto-Scale is recommended for most situations. This works with FITS and SBIG format files, extracting the exposure time from the image header and automatically scaling to match the exposure duration. Note that MaxIm DL will automatically attempt to find the group with the closest matching exposure time; if Auto-Scale is set but there is a group with an exactly matching exposure time, no scaling will be performed. So Auto-Scale is a safe default setting.
Auto-Optimize is especially useful if your camera is not temperature regulated, or the exposure duration is unknown. It attempts to find the scaling that produces the least RMS noise in the final image. If the temperature of the light frame closely matches the dark frame, then Auto-Scale is recommended instead.
Manual gives you manual control over the scaling factor. The Scale Factor is entered as a multiplication factor to be applied to the dark frame. This is rarely used.
None turns off dark frame scaling altogether.
Note that dark frame scaling is also used for dark-subtracting the flat-field frames. So you can either take a set of "flat-darks", or just use the same darks as for your light frames - even if the exposure time is different.
Combine Type allows you to specify the algorithm to be used for combining the images in the group into a single, master image:
Average simply averages together the dark frames in the group.
Median can be useful for suppressing random cosmic ray hits and other types of impulsive noise. A median calculation produces an RMS noise level about 25% higher than that when averaging, but combining more calibration frames can compensate for this.
Sigma Clip combines the advantages of Average and Median, but requires more intensive calculations (and more settings - see below). It rejects "outlier" pixels and averages the remaining pixels.
SD Mask is a custom algorithm developed by Ray Gralak, which is similar to Sigma Clip but is more effective when working with relative small numbers of images (see below for settings).
If Apply To All Groups is checked, then any change to the dark frame scaling (if appropriate) or combine method and its settings will be propagated to all other enabled (checked) groups. Otherwise changes affect only the currently selected group.
The Bad Pixel Map dropdown is enabled when a dark group is selected. It lists all non-empty bad pixel maps defined in the Remove Bad Pixels command. If a dark group is used to calibrate an image, its associated bad pixel map is automatically applied at the end of the calibration process, after the pedestal has been added to the image. You must make sure that the bad pixel map is appropriate to its dark group (i.e., correct camera, binning, etc.). Select the entry <NONE> if you do not wish any bad pixel map applied when a particular dark group is used.
Flat Norm. specifies the type of normalization applied to a flat group. Select Monochrome except when working with images from a DSLR or one-shot color camera, where adjacent pixels vary in intensity due to the different filters covering them. Ordinary normalization of a flat field would remove essentially all the color information from such images. Two methods of dealing with this are available: either use Boxcar Filter which blurs the flat field slightly, or select Bayer Planes to normalize the flat separately for each color subimage.
Manual Group Setup
Manual setup is usually only done by more advanced users, or if you are dealing with files that do not have FITS headers and cannot be automatically sorted into groups.
The Add Group button allows you to create a new, empty group. The group type is set by the combo box next to the Add Group button. If <AUTO> is selected, the type is assigned according to the first file that is added to it. Click Remove Group or press the Delete key to delete the selected group. Clear All Groups deletes all of the existing groups.
The list of Calibration Groups can be sorted on any column by clicking on the column header. Sorting never affects the way image calibration is actually done.
To change the type of an existing group, right-click on its row and select the new type from the context menu. To change a group's name, double-click anywhere on its row, then type the new name into the Name column. For monochrome Flat groups, you can double-click directly on the Filter cell to modify it. In either case, press Enter to complete the edit.
Clicking the Add button displays a dialog that allows you to add new files to the list; alternatively, you can drag and drop a list of files from Windows Explorer onto the Set Calibrate dialog. Remove (or the Delete key) removes the currently selected files from the group. Normally, the list of files shows the full path to each file. If you click Show File Names Only, then only the file name will be displayed. You will be prevented from adding images with incompatible properties to the group (for instance, you can't add a 256x256 image to a group that already contains a 512x512 image). Also, if a group contains a master calibration frame, then that is the only file that may be present in the group. You may not add a master frame to a group that already contains other images, and you may not add any other images to a group that already contains a master.
Sigma Clip and SD Mask Settings

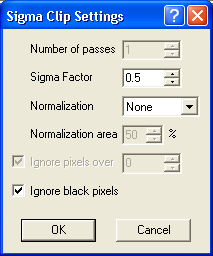
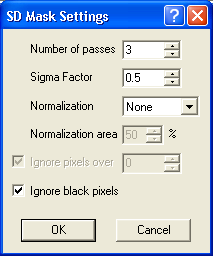
When the Sigma Clip or SD-Mask (Standard Deviation Mask, a custom algorithm contributed by Ray Gralak) combine algorithms are selected, additional parameters are required to control how the images are combined. In both cases, the input images are normalized to the same intensity level before they are combined. Normalization works by examining a rectangular Normalization area that occupies the center of each input image; the size of the rectangle is a proportion of the input image, as specified by the Normalization area. Two algorithms are available for normalizing the images. If Delta-Level is selected, then only the image background levels will be modified by normalization. If Linear is selected, then linear regression is used to determine a combination of changes to the background level and the scaling of the image data, resulting in images with equivalent overall intensity levels.
Both algorithms work by calculating the mean of each pixel value, for all of the input images, as well as the standard deviation of those pixel values. If Ignore Black Pixels is checked, then any pixel with a value of 0 is excluded from the mean/standard deviation calculation. If Ignore Pixels Over is checked, then any value exceeding the specified value will also be excluded from the mean/standard deviation calculation.
The Sigma Clip algorithm works as follows. Once the mean and the standard deviation of the input pixels are known, the pixel that is farthest from the mean is selected. MaxIm DL will then calculate the number of standard deviations between the mean and the outlier pixel's value. If the outlier pixel's value is fewer than Sigma Factor standard deviations from the mean, then the calculated average is assigned to the output. If the outlier pixel's value is greater than Sigma Factor standard deviations from the mean, then the outlier pixel is discarded from the set of input pixels, and the mean of the inputs is re-calculated, excluding the outlier. The new mean is then assigned to the output pixel.

When using the SD-Mask algorithm, a similar technique is used. The SD-Mask algorithm works by repeatedly applying the same process to the image, for a number of times given by the Number of passes. With each pass, the input images are normalized to the same intensity level (see above for a description of normalization). Then, for each pixel in the output image, the standard deviation of the set of input pixels is calculated. If the standard deviation exceeds the Sigma Factor (note that this parameter has a different effect and purpose than in Sigma Clip) then the median of the input values is assigned to the output. Otherwise, the output is the mean of the inputs. The idea is to use the mean where possible because it does a better job of suppressing gaussian noise, and to use the median only when there is reason to expect that the input data contain outliers.
Advanced Settings
The Advanced settings should only be changed by advanced users.

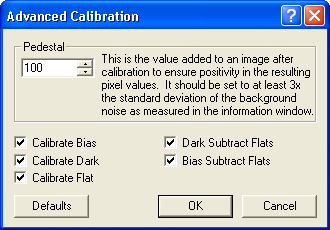
The Pedestal setting is used to compensate for noise in the calibration frames and in the image being calibrated. This value is added to the final calibration frame so that all of the pixel values are positive, and is recorded in the PEDESTAL keyword of the FITS header. It should be set to 3x the standard deviation of the background noise for the image, as displayed in MaxIm DL's information window. You may need to increase this number for certain models of cameras.
The Calibrate Bias, Calibrate Dark and Calibrate Flat check boxes are used to enable or disable the use of the associated type of group for calibration. If bias and dark subtraction are both enabled, then the dark frame will always have the bias frame subtracted from it. Flat fields are themselves calibrated before being used to calibrate a light frame, but it is possible to disable the bias subtraction and dark subtraction steps using the Dark-Subtract Flats or Bias-Subtract Flats check boxes. Normally these functions should all remain enabled, since MaxIm DL automatically determines the correct files to use.