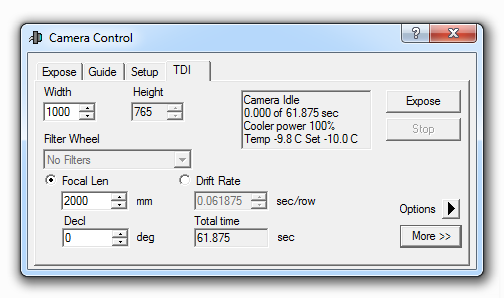
The TDI tab is used to control Time Delayed Integration, also referred to as Drift Scan imaging. This tab is only displayed if the selected main CCD camera chosen using the Setup tab is capable of TDI operation. Refer to the Equipment Setup section to determine if your equipment can acquire TDI images.

TDI imaging is very different from traditional CCD imaging. To begin with, the camera position must be fixed with respect to the earth, rather than tracking the sky using a clock drive. Furthermore, the camera must be precisely oriented so that each star image trails "down" the CCD array without shifting to adjoining columns. The camera is actually rotated so that its readout row is located along the (optically) west side of the array, where the starlight falls immediately before the star drifts out of the field of view.
The TDI mode moves the electrical charges from pixel to pixel across the CCD array at a fixed speed. This speed is chosen to match the rate of drift of the stars across the array. The effect is that although the spot image of the star moves across the sensor, the photoelectrons do not smear out in a streak but are kept herded together in a small group of pixels equivalent to the spot size. When the star image reaches the edge of the sensor the data digitized and transferred to MaxIm DL. The effective exposure time is therefore the length of time it takes the star to drift from top to bottom across the CCD sensor.
The main advantage of TDI is that it can capture a single, continuous long strip running West to East across the sky. Rows can be read off continuously for minutes or (subject to memory limitations) hours. A secondary advantage is in image quality. Each pixel in the final image has a contribution from many pixels in the camera, so any pixel-to-pixel variations in the sensitivity and dark current are minimized in the final image.
You specify the desired image size in advance by specifying its Width. This is actually the number of CCD rows of image data that will be transferred, since the camera is rotated 90° from North and MaxIm DL transposes the TDI image to its natural horizontal format. The image's other dimension, Height, is fixed at the full width of the sensor in your CCD camera and is not adjustable. Neither binning nor subframes are supported in TDI images.
The exposure duration is the product of the Width and the Drift Rate, which is the integration time per row. This can be entered directly in seconds per row by clicking the associated radio button. But it is easier to specify the Focal Length (Focal Len) of the optical system and the Declination (Decl) of the centre of the field. When you do this, MaxIm DL displays the calculated Drift Rate for your information.
Be sure to take into account any focal reducers, etc., when specifying focal length, and be aware that the actual focal length of your equipment may vary significantly from the nominal value cited by the manufacturer. In fact, focal length can change depending on focus position. Obtaining round star images from TDI requires both correct drift rate and precise E–W orientation of the CCD array. An excellent way to check the alignment and focal length is to take a regular tracked image, and use the PinPoint Astrometry feature.
The drop-down combo box at the left side allows you to select a filter for the exposure. This control is only available when a filter wheel is selected in the Setup tab.
The four-line Status display in the middle of the tab includes the camera state, cooler status, and exposure time.
The Expose button starts an exposure. During an exposure, the Expose button is disabled, and the Stop button is enabled. The Stop button allows you to terminate the exposure in progress. Data already acquired is not lost when an exposure is aborted. There is no way to continue an aborted exposure, although you can easily start a new one; you may wish to reduce the row count and/or save and close the previous image to reclaim memory.
The Options button ![]() displays a menu containing several commands. Camera Settings displays the Advanced configuration dialog for your camera. When Use Scope Dec is checked, the current declination is read from the Observatory Control and entered automatically into the Decl control, which is grayed out when this information is available. Show Tool Tips controls whether hints are displayed for the available controls.
displays a menu containing several commands. Camera Settings displays the Advanced configuration dialog for your camera. When Use Scope Dec is checked, the current declination is read from the Observatory Control and entered automatically into the Decl control, which is grayed out when this information is available. Show Tool Tips controls whether hints are displayed for the available controls.