This command allows you to blink back and forth between two images, or create an animation from a group of images. This function is often used for detecting moving solar system objects such as asteroids or objects that change in brightness (variable stars, novae, supernovae).
Prior to animation/blinking, you may wish to apply the Equalize Screen Stretch command to adjust all images to the same brightness and contrast. The Equalize Screen Stretch command can also be used while Animate is active as long as it appears on a displayed toolbar (the View menu item itself is disabled during animation).
Using the Animate command is a three-step process: selecting images, aligning images, and viewing.
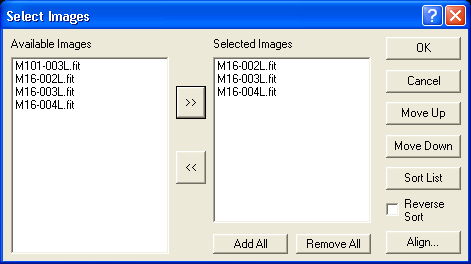
When the command is activated, a Select Images dialog box appears first. It allows you to select the images to be included. Select one or more of the images in the Available Images list on the left using the mouse, then click the ”>>” button to copy them to the Selected Images list on the right. You can also remove images by selecting them on the right and clicking the ”<<” button. Note that ranges of images can be selected using SHIFT-click, and individual images can be picked using CTRL-click.
The Add All button adds all of the Available Images into the Selected Images list, and the Remove All button clears the Selected Images list.
When more than two images are selected, the order may be important. The images may be sorted alphanumerically by name using the Sort List button. The direction of sort is increasing downward unless the Reverse Sort check box is selected, in which case the sort is decreasing downward.
Individual images may be moved up and down the list by selecting them with the mouse and clicking the Move Up or Move Down button as required.

If the images are already aligned, the OK button should be clicked to start viewing. If the images need to be registered, click the Align button. At least two images must be selected before you can proceed.
This step is optional; you will need to use it if your images are not already registered. If the Align button was clicked in the previous step, the Align Images dialog will appear, along with a special Align image buffer. Refer to Process menu Align for a full description of how to align images.
On completing image alignment, you are automatically returned to the image selection step. Click OK there to move on to the Animate dialog itself.
When OK is clicked in the Select Images dialog boxes, the small Animate toolbox appears. If visible, the Information and Screen Stretch windows disappear so that time is not wasted updating them during the animation. MaxIm DL shows a temporary image buffer named Animate, suffixed with the name of the currently displayed image. As for any image buffer, it can be panned and zoomed. You can adjust the screen rendition using the Quick Stretch method (SHIFT-click on image, hold down the button and drag); animation is automatically suspended while you are doing this. When you quick stretch the Animate buffer image, the resulting screen stretch settings are propagated to the other images involved in the animation. If you need to tweak the stretch settings for a particular image, click on that image (or its image tab, if present), and perform the necessary quick stretch; stretches applied to individual images are not automatically propagated to the others.
The topmost button is the Close button which terminates animation. Below that is the speed control, which selects the delay in seconds before the next image is presented.

The next four buttons resemble those on a tape recorder or VCR. The two broken arrow buttons allow you to step forwards and backwards through the image list. The ”play” button (arrow) starts the animation process, and the ”stop” button (square) stops it.
If the ![]() button at the bottom left is depressed, play "loops", that is, cycles back to the first image after the last image has been displayed. If it is unchecked, animation stops after the last image has been displayed. Looping has no effect on the operation of the step forwards and backwards buttons.
button at the bottom left is depressed, play "loops", that is, cycles back to the first image after the last image has been displayed. If it is unchecked, animation stops after the last image has been displayed. Looping has no effect on the operation of the step forwards and backwards buttons.
The "projector" button ![]() at the bottom right closes animation and opens the Write AVI dialog with the frame list populated with the images that were being animated. The frame rate is initialized to the closest available AVI frame rate to the animation interval that was selected. You can add or remove frames and change any setting before creating the video file. Note that you cannot return to the Animation dialog short of activating the Animate command again and reselecting the required images.
at the bottom right closes animation and opens the Write AVI dialog with the frame list populated with the images that were being animated. The frame rate is initialized to the closest available AVI frame rate to the animation interval that was selected. You can add or remove frames and change any setting before creating the video file. Note that you cannot return to the Animation dialog short of activating the Animate command again and reselecting the required images.
The Update Info check box turns on/off updating of the Line Profile, Information, FITS Header, and Zoom windows. Turning off updating can provide faster animation rates for larger images.