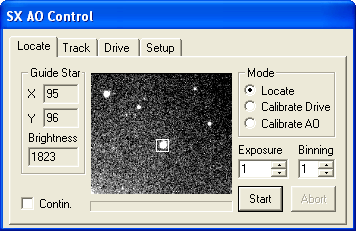
The Locate tab is primarily used to locate a guide star. It also allows the user to calibrate the telescope drive motor and the AO deflection. Selecting one of the three Mode options (Locate, Calibrate Drive or Calibrate AO) allows changes to the operation that will be executed by the Start button.

Locate Mode
In order to find a suitable guide star to track on, first select the Locate mode. Choose an Exposure duration (in seconds), and click the Start button. Once the image is taken, MaxIm DL will automatically select the best guide star candidate in the image, and report its information in the Guide Star group box. The Guide Star X and Y fields display the guide star position, in pixels, within the CCD chip, and its maximum pixel brightness is shown in the Brightness field below the coordinates. A small box is drawn on the image to indicate the star's position. If you wish, you may click on any other star in the image to override the automatic star selection and select a new guide star to track.
Use the Binning control to enter the binning value to use when acquiring images through the guide camera. With larger bin sizes the exposure time can be reduced while still obtaining a useable image. The maximum binning allowed for most Starlight Xpress cameras is 4x4.
Check the Contin. (short for Continuous) check box to enable constant imaging. When this check box is checked, and the Start button is pressed to acquire an image in Locate mode, the camera will return images constantly until the Abort button is pressed.
If a suitable guide star cannot be located, reposition the instrument, turn on binning, or increase the exposure.
Calibrate Drive Mode and Calibrate AO Mode
Both the Calibrate Drive mode and Calibrate AO mode operate identically, except in the former case the motor drive is activated, and in the latter case the pane of glass in the AO is tilted.
Before calibrating, ensure that a star is near the center of the image by using the Locate mode; adjust the telescope position if necessary. Set the Exposure duration (in seconds), select the desired star with the Mouse, and then click the Start button. The SX AO Control will then take a series of five exposures comprising a reference image, and one image in each instance after tilting the AO (or moving the mount) in the +X, -X, +Y and -Y directions. Each time a new image appears, a small cross will be superimposed on the selected guide star. If for some reason the cross does not appear in the correct location for every exposure, the calibration has failed. Normally this would only happen if the star left the field of view. (Note that if you disable one motor drive axis on the Drive tab only three exposures will be taken in the Calibrate Drive Mode.)
The location and brightness of the star used in the calibration will be displayed in the Guide Star X, Y and Brightness fields after each exposure. From the collected data, the SX AO Control Window will then calculate the required calibration settings. These settings can be viewed on the Drive tab for Calibrate Drive mode or the Setup tab for Calibrate AO mode.
If during the calibration the star leaves the field or does not move sufficiently in one or both directions (minimum 5 pixels) an error message will be displayed. If the star moved too little or too much in one axis during the Calibrate Drive routine, click the Drive tab and change the Calibration Time for the appropriate axis. Note that the software has been designed to ignore, as much as possible, a second star entering the field.