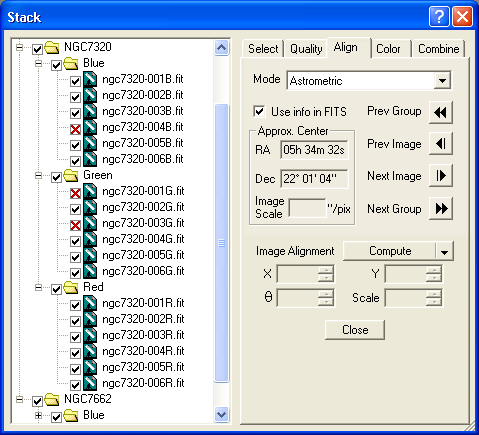
The Align Tab computes the alignment required to match up all the images. This does not affect the images being stacked, unless you specifically request that the alignment be applied to make the results permanent, updating the image windows or being saved to disk.
Note: Switching to the Align Tab forces Auto Display mode on automatically, with one important difference from how it operates on the other tabs: if the spatial relationship between the current image and the reference is known, both are displayed together as a single "red/green composite image". Properly aligned stars display as white, which allows you to see at a glance if the alignment is good.
The Align tab also turns on the Information window in Aperture mode. It is restored to its original state when leaving the Align Tab, unless you have changed its mode explicitly.

Depending on the alignment mode, different controls will appear. The controls common to all modes will be described first.
Prev Group moves you to the previous image group in the Tree View and displays the last image in that group. Prev Image moves you to the previous image in the current group. Next Image moves you to the next image in the current group. Next Group moves you to the first image in the next group. These controls are most useful when using manual combine modes, or when checking alignment.
The drop menu allows you to perform various functions or select options. For convenience, the associated button shows the first applicable command. The options are:
Preview – preview the current alignment against the reference image. Use this if you change the X, Y, Theta or Scale controls from their automatically assigned values. (This is only possible in certain alignment modes.)
Compute – compute the alignment for the currently selected image.
Compute All – compute the alignment for all images.
Export Measurements – outputs the measured X, Y, Theta and Scale values for the selected images in CSV format, compatible with Microsoft Excel. This command is not enabled unless alignment has been established for all selected images.
Reset – reset the computed alignment for all images.
Bicubic Resample – when checked, the aligned result is calculated using a bicubic resample algorithm. When off, a simple bilinear algorithm is used. Bicubic is generally better when a rotation is being performed. Some users prefer to use bilinear when the image is only being shifted.
Prev/Next Image Scope – affects how the Prev Image and Next Image buttons behave in color subgroups. Image selection can be restricted to the Current Group Only, with image focus wrapping around from first to last (or vice-versa). In All Groups for Object mode, the images of all color channels are treate as contiguous. This is particularly useful in Manual 2 stars alignment mode since you can tag Star 1 in all images of an RGB or LRGB group before changing to Star 2.
Alignment Destination – displays a dialog allowing you to specify how and where aligned files and images are saved by the Compute and Align Images command. This dialog is described below.
Compute and Align Images – if any selected images or group have not yet had their Image Alignment parameters computed, do so; then update the input files and images with the registered image data. The destination location for the resulting aligned images should be set using the Alignment Destination dialog described below. This command is not necessary when you are simply combining images, but is useful when you need actual registered images.
FITS Floating Point – when checked, the saved images are stored in FITS IEEE floating-point format. This preserves the exact pixel values. When off, the images are saved in their original format, which may result in some truncation of the data values.
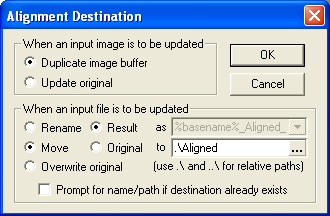
If the image being aligned was already open in a window, you select the behavior under When an input image is to be updated. The options are Duplicate image buffer, which creates a new window, and Update original, which simply alters the existing one.
If the image being aligned is a file on the hard drive, you select the behavior under When an input file is to be updated. There are a number of options. You can elect to:
Rename the image. See below for an explanation of the file renaming scheme.
Move the image. The file can be moved to another folder. You can create a subfolder by entering ".\Aligned", for example, which will save the results to a subfolder under the original image folder named Aligned. You can also hit the ... browse button and locate a folder to receive all the aligned images.
Overwrite original, which simply changes the original file on disk. This is only recommended if you have a secure backup copy of the image; otherwise you will be changing your original raw data.
If you decide to rename or move the file, you can elect to do this either to the Result of the alignment, or the Original file.
The Rename option has a very sophisticated mechanism for determining the new filename. You can specify the filename with text plus a series of placeholders beginning and ending with % signs, as in %basename%. Each placeholder within the filename will be replaced with information related to the file being updated. Placeholders can be picked from the droplist to the right of the renaming edit field:
Base name (%basename%) – replaced with the base filename of the original file.
Object name (%object%) – replaced with the object name of the group that contains the image.
Serial number (%serial%) – replaced with a "serial number" that makes the resulting filename unique.
Time stamp (%datetime%) – replaced with a numeric string giving the date and time of the image.
File extension (%ext%) – replaced with the file extension.
Percent sign (%%) – puts a single % in the filename.
Finally, if during the alignment process a file of the same name already exists in the folder, you can be prompted to correct the problem. To enable this, check Prompt for name/path if destination already exists.
Alignment Modes
Stack has a number of alignment modes available:
None – no alignment is performed.
Auto - correlation – automatic, performs shift only. A cross-correlation is calculated between the two images to determine the relative offset. If point sources (stars) are available in the image they are used to refine the alignment to sub-pixel accuracy.
Auto - star matching – automatic, performs scaling, shift, and rotation. Star patterns are compared and matching stars are recognized. Centroids are calculated for well-separated stars, and comparison of the positions of the same stars in different frames is used to calculate the alignment. This is the most convenient method for deep-sky images.
Manual 1 star - shift only – manual, performs shift only. The user marks an "alignment point" on each image using the mouse. MaxIm DL calculates the necessary shift in each axis to register the alignment point with that in the reference frame. See below for additional details.
Manual 2 stars – manual, performs scaling, shift and rotation. Same as Manual 1 star, except two alignment points must be set in each image. This enables MaxIm DL to calculate scaling and rotation as well as displacement. See below for additional details.
Astrometric – automatic, performs scaling, shift, and rotation. Uses World Coordinate System (WCS) information from the FITS header, which is calculated by PinPoint Astrometry. This is the most precise and reliable alignment technique for images containing stars. Plate solutions will automatically be attempted for any images that have not already been solved, but you must first configure the PinPoint command for catalog selection and other required parameters. Select Use info in FITS for images having valid telescope pointing and scale information in their FITS headers, or fill in the Approx. Center RA, Dec, and Image Scale fields if they do not. Once an image has been solved, these controls are relabelled as the Solved position and cannot be changed.
Planetary – automatic, performs shift only. Calculates a centroid for the planet as a whole.
Auto one star – automatic, performs shift only. The brightest star in the image is assumed to be the same object in each frame. A centroid is calculated and the offset from the reference frame determines the alignment.
Overlay – manual, performs shift and rotation. Controls are provided to nudge the image in small increments. You can adjust for offset and rotation. The images are overlaid in different colors so you can see when they are improperly aligned. See below for additional details.
The extra controls for the manual modes are described below. In addition, you can set some or all of the alignment parameter edit boxes, depending on the mode. Manual modes also let you drag an image into rough alignment with its reference using the mouse. This can be useful if you are uncertain which star you need to identify. Note that once the red/green composite image is displayed, you must click on stars in the green plane when re-tagging.
Manual 1 star - shift only
This is the fastest manual adjustment method. Simply click on a particular star or other recognizable feature on each image.
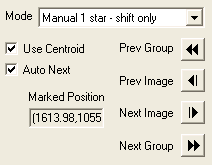
You can move sequentially through the images using the Next Image and Prev Image buttons, or select any desired image from the tree control. To speed up the tagging process, set the Auto Next check box: every time you tag a star on the image, the next image will be displayed automatically.
If the alignment point is a star or similar point source, turn on the Use Centroid check box. At each clicked location a centroid will automatically be calculated and used to refine the adjustment to the sub-pixel level.
Manual 2 stars
This method is similar to the Manual 1 star method, but requires you to set two alignment points in each image. A digit "1" or "2" is displayed next to the rings cursor, indicating which alignment point will be set when you click the mouse.
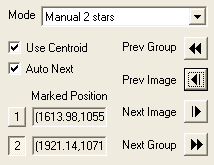
To speed up the tagging process, set the Auto Next check box: every time you tag a star on the image, the next image will be displayed automatically. The alignment point 1/2 buttons will be toggled automatically if the currently selected point is already set in the next image. If both alignment points have been established, both buttons are popped up. You can still select either and retag manually if necessary.
You may tag alignment points and images in any order, but it is easiest to go through the images sequentially and set alignment point 1 in each, clicking on the same object in each image. Then make a second pass and tag another object on each image, well separated from the first, as alignment point 2. If you are not using Auto Next, or you need to correct a previous alignment point, you can toggle the alignment point buttons and use the Next Image and Prev Image buttons as required.
If the alignment point is a star or similar point source, turn on the Use Centroid check box. At each clicked location a centroid will automatically be calculated and used to refine the adjustment to the sub-pixel level.
Overlay
This mode is useful when no obvious registration points are available, such as planetary images with indistinct features.
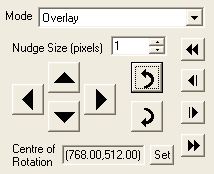
First set one of the images as the reference image or confirm that the Stack command's default choice is acceptable. If not, look through the images using the Next Image and Prev Image buttons. Pick an image and select the Reference item from the right-click menu of the tree control.
Next, move to another image using the Next Image or Prev Image button. As soon as you start to drag the image or click any of the arrow buttons, the image will be overlaid in green on the reference image in red. This helps you assess image alignment more easily.
Continue to drag or use the up, down, left, and right arrow buttons to align the the image with the reference. The distance a button-click moves the image is controlled by Nudge Size (pixels), so you can position an overlaid image to a fraction of a pixel. By contrast, dragging with the mouse always moves the image by an integer number of pixels.
If correct registration requires that the image be rotated, click the Set button, then on the point that you want to pivot about. (Set center of rotation, which appears in the image's context menu, is a single-step alternative.) Click the rotate clockwise (right) or rotate counterclockwise (left) buttons as required; each click rotates the image by the number of degrees specified in Nudge Size. For coarse rotation, you can Alt-drag with the mouse, i.e., hold down the Alt key when starting the drag.
It is often convenient to align a single star without regard to rotation, then use it as the rotation point while aligning the rest of the image.